09.Building and Submitting Transactions with js
이 문서는 hyperledger sawtooth 1.0.4을 docker for ubuntu(18.03.01-ce)에서 다루며 os는 ubuntu-18.04 LTS임
1. Overview
이번 문서에서는 자바스크립트 코드로 트랜잭션을 만들고, validator에 제출해보도록 하겠습니다.
node.js사용
2. Prerequisites
이전 문서에서 했던 과정을 그대로 따라해주시고 docker-compose커맨드로 sawtooth를 실행시켜주시기 바랍니다.
같은 폴더 안에 있는 package.json과 compile_protobuf.js파일, protobuf폴더와 protos폴더를 클론받아 프로젝트에 추가시켜주세요.
3. Install Package
cmd창에서 다음 커맨드를 통해 패키지를 설치합니다.
npm install
패키지를 설치하고 나면 프로젝트 구조는 다음과 같이 구성됩니다.
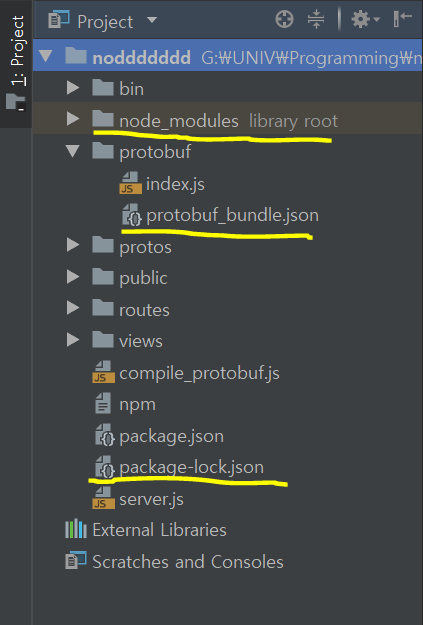
node_moudules에는 package.json에 기재되어있던 의존모듈이 추가되고 scripts의 prepublish를 통해 compile_protobuf.js가 컴파일되고 payload를 인코딩할 수 있는 protobuf_bundle.json이 추가됩니다.
4. protobuf_bundle.json
protobuf_bundle.json파일은 compile_protobuf.js파일을 컴파일함으로써 protos폴더 안의 proto파일을 json형식으로 나타낸 것입니다. 이를 통해 Payload가 어떤식으로 구성되어야하는지를 알 수 있게됩니다.
proto 파일에 대한 정보는 여기
5. Payload 구성
Payload를 구성함에 있어 가장 주의깊게 봐야할 부분은
Encoding하는 부분입니다. 모든 트랜잭션 패밀리에서 payload를 parsing하는 방법이 다르기 때문에 보내는 방법도 각양각색입니다.
반드시 참고해야할 트랜잭션 패밀리의 핸들러 소스코드와proto파일을 읽어보셔야합니다.
5.1 Intkey
intkey 트랜잭션 패밀리는 payload를 CBOR로 encoding하고 json형식으로 작성해야합니다.
const cbor = require('cbor')
const payload = {
    Verb: 'set',
    Name: 'foo',
    Value: 42
}
const payloadBytes = cbor.encode(payload)
5.2 Xo
Xo 트랜잭션 패밀리는 payload를 작성하는 방법이 Intkey와는 사뭇 다릅니다.
class XoPayload:

    def __init__(self, payload):
        try:
            # The payload is csv utf-8 encoded string
            name, action, space = payload.decode().split(",")
        except ValueError:
            raise InvalidTransaction("Invalid payload serialization")
    ...
xo트랜잭션의 payload를 핸들링하는 소스코드의 일부입니다. try문 안을 보면 name, action, space의 순서대로 “,“를 기준으로 parsing하고 있습니다.
xo 트랜잭션의 payload를 구성할 때는 json형식으로 구성한다면 InvalidTransaction 에러가 뜰 수 밖에 없습니다.
    const payload = "game1,create,";
    const payloadBytes = cbor.encode(payload);
위와 같이 페이로드를 구성하면 됩니다.
5.3 Identity
세 번째 예시는 Identity 트랜잭션 패밀리입니다. 제가 예시를 들어볼 트랜잭션은 policy를 생성하는 트랜잭션입니다.
Identity 트랜잭션을 만드려면
npm install하기전에 protos 폴더에 identities.proto 파일이 존재해야합니다.
sawtooth-core의 protos폴더에는 identities.proto파일이 존재하지 않고, 여기에 있으니 참고하시기 바랍니다. 현재 문서의 protos 폴더에는 identities.proto를 추가시켜놨습니다.
단순히 require(“protobuf”)를 하게 되면,
node_modules를 참조하게 됩니다. 하지만 우리는 identities.proto를 임의로 추가시켜 protobuf_bundle파일을 생성했으니node_modules가 아닌 로컬의 protobuf파일을 참조하게 해야합니다.따라서 이와같이 작성하여야 합니다.
const {Policy,IdentityPayload,TransactionHeader,Transaction,BatchHeader,Batch,BatchList} = require("../protobuf");
protobuf_bundle.json 파일로 가서 payload를 만들기 위한 양식을 찾아봅시다. Policy나 Role을 세팅하기 위한 json 포맷은 다음과 같습니다.
    "IdentityPayload": {
      "fields": {
        "type": {
          "type": "IdentityType",
          "id": 1
        },
        "data": {
          "type": "bytes",
          "id": 2
        }
      },
      "nested": {
        "IdentityType": {
          "values": {
            "IDENTITY_TYPE_UNSET": 0,
            "POLICY": 1,
            "ROLE": 2
          }
        }
      }
    },
먼저 최종적으로 IdentityPayload에 들어가야할 내용은 type과 data입니다. type은 IdentityType을 참고하고 있고, IdentityType은 하단의 nested안에서 확인할 수 있습니다.
제가 예시로 들 내용은 policy를 세팅하는 것이니 type은 1이 될 것입니다.
다음으로는 data입니다. data에는 policy에 세팅할 정보가 들어가게 될 것입니다.
    "Policy": {
      "fields": {
        "name": {
          "type": "string",
          "id": 1
        },
        "entries": {
          "rule": "repeated",
          "type": "Entry",
          "id": 2
        }
      },
      "nested": {
        "EntryType": {
          "values": {
            "ENTRY_TYPE_UNSET": 0,
            "PERMIT_KEY": 1,
            "DENY_KEY": 2
          }
        },
        "Entry": {
          "fields": {
            "type": {
              "type": "EntryType",
              "id": 1
            },
            "key": {
              "type": "string",
              "id": 2
            }
          }
        }
      }
    },
Policy는 name과 entries가 필요합니다. name은 String형, entries는 Entry형이고 반복될수있습니다.
다음과 같은 커맨드는
$ sawtooth identity policy create p1_name "PERMIT_KEY *"
이렇게 구성될 수 있습니다.
    const policyBytes = Policy.encode({
        name: "p1_name",
        entries: [
            {
                type: 1,   //PERMIT_KEY
                key: "*"
            }
        ]
    }).finish();

    const payloadBytes = IdentityPayload.encode({
        type : 1,          //policy
        data : policyBytes
    }).finish();
CBOR을 사용하지 않고, protocol buffer의 encode를 사용하고 있습니다.
identity는 트랜잭션을 보낼 때 allowed_key로 정해진 key만 sign이 가능합니다.
6. Signer
공식 문서의 예시에서는 랜덤으로 privateKey를 생성하여 트랜잭션과 배치에 서명하게 되어있습니다.
특정 privateKey로 서명하고 싶다면 다음과 같이 하면 됩니다.
        const context = createContext("secp256k1"); //암호화 컨텍스트

        const privateKey = Secp256k1PrivateKey.fromHex("8a0d61af0a9518bcf4d60f013edc5da6876fcd4dad9ee0f3a832a0c67122faae");
        const signer = new CryptoFactory(context).newSigner(privateKey);
7. Transaction Header
트랜잭션의 헤더는 다음과 같이 작성할 수 있습니다.
    const transactionHeaderBytes = TransactionHeader.encode({
        familyName: "sawtooth_identity",      //보내려는 트랜잭션의 패밀리 네임
        familyVersion: "1.0",
        inputs: ["000000", "00001d"],         //input : read from
        outputs: ["00001d"],                  //output : write to
        test: signer.getPublicKey(),
        signerPublicKey: signer.getPublicKey(privateKey).asHex(),
        // In this example, we're signing the batch with the same private key,
        // but the batch can be signed by another party, in which case, the
        // public key will need to be associated with that key.
        batcherPublicKey: signer.getPublicKey(privateKey).asHex(),
        // In this example, there are no dependencies.  This list should include
        // an previous transaction header signatures that must be applied for
        // this transaction to successfully commit.
        // For example,
        // dependencies:['540a6803971d1880ec73a96cb97815a95d374cbad5d865925e5aa0432fcf1931539afe10310c122c5eaae15df61236079abbf4f258889359c4d175516934484a'],
        dependencies: [],
        payloadSha512: createHash("sha512").update(payloadBytes).digest("hex")
    }).finish();
input과 output에 관한 정보는 여기의 line 49처럼 define된 변수가 있거나 공식문서의 트랜잭션패밀리를 다룬 부분의 Addressing을 확인하면 됩니다.

만약 input과 output을 틀리게 적었다면 위와같은 오류가 발생합니다.
이 뒤의 내용은 공식문서의 예시와 같으니 참고하시면 됩니다.
8. 마치며
수고하셧읍니다^^7 점점 새로 공부해야하는 내용이 많아지네요. 다음 문서는 뭐로 작성하면 좋을지 고민중..
댓글남기기